Tire Tracking System
Introduction
When you
start the application the following screen will appear

Note the 19
tabs on the left, they let you access the different
modules:
- Init: the initialization pane showed
at startup
- Param: system wide parameters
(language, currency, units of measure, initialization options, …)
- Manufacturers: to add, update, delete
manufacturers
- Models: to add, update, delete the
tire models of manufacturers
defined in the previous screen
- Dimension: to add, update, delete tire
dimensions
- Reasons: to add, update, delete reasons
why tires were removed from a vehicule or why they were retread
- Trains: to add, update, delete trains.
A trains is a combination of axles and tires. It
defined a motorized vehicle or a trailer
- Enterprises: to add, update, delete a
company to which vehicles and optionaly tires will belong
- Vehicles: to add, update, delete a
vehicle having a certain train and assigned to an enterprise
- Vehi Histo: to add, update, delete a
vehicle history record which contains distance data (miles or kilometres)
- Tires: to add, update, delete tires
- Retreads: to add, update, delete threads
on a tire
- Tire Histo: to add, update, delete wear
data on a tread
- Rotation: to perform tires rotation on a
vehicle
- Tires-Vehicles: to install or remove a tire
from a vehicle
- Statistics: quick statistics about what
the wear should be today on all tires according to history records and
which rotations are due
- Reports: differents reports about the
cost by wear, days, miles or kilometres
- Graphs: graphics related to the
reports
- Server: when used as a server,
statistics about the clients
02) Parameters screen:
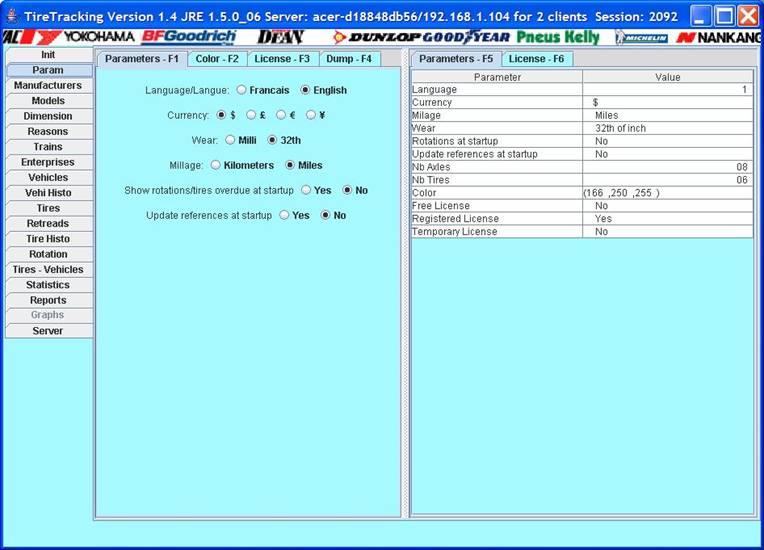
This screen
allows you to define:
- The language to be used
- The currency to be used in the
reports
- If the wear is calculated in
32th of inch or millimeter (this is a default that can be changed for each
tire model)
- If the distance is calculated
in miles or kilometres (this is a default that can be changed for each
vehicle)
- If rotations dues are showed at
startup
- “Update references at startup”
will be explained later
The “Color”
tab is used to change the background color if you do not like the default light
blue color.
The
“License” tab is used to manage the license if you have a purchase a license
for advanced features.
The “Dump”
tab is used for support reasons if we need to investigate a bug at your site.
03) Manufacturers screen:
04) Models screen:
05) Dimensions screen:
06) Reasons screen:
These
screens have all three (3) tabs on the top used to add, update, delete an entry.
All screens
have a “remark” field into which to can write what you want.
Usually you
can access a field (manufacturer, vehicle, tire, …) by
selecting it with a drop down menu on the left panel or by cliquing on the field
on the right panel.
The right
of the screen shows all entries already entered.
When an
entry is referenced its color is in blue.
Let us see
some examples:
Adding a manufacturer:
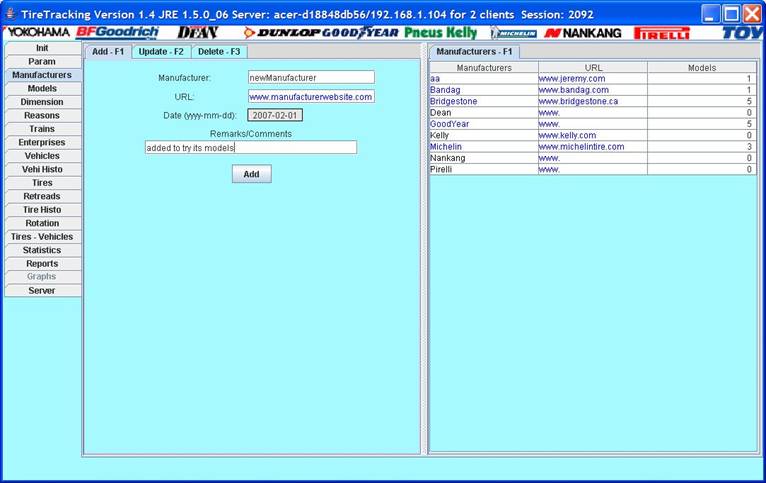
Note that
the list of manufacturers already entered appears on the right of the screen.
Manufacturers that are referenced by a tire model are in blue and the number of
models that referenced the manufacturer is also displayed.
Just fill
the fields and click the “Add” button.
Updating a model:

Note that
the right panel has now three (3) tabs showing the already enterered models by
alphabetical order “Model-Manu”, by manufacturers and the models “Manufac-Mod”
or just the manufacturers “Manufac”.
To select a
model to update you can:
-
on the left panel select the manufacturer on the drop-down list and then
select the model on the second drop-down list
-
on the right panel click with the mouse on the model you want to edit
Updating a
model allows you to:
-
change its manufacturer (if you have enterered the wrong manufacturer
when you created the model)
-
change its name
-
change its color (to rapidly identify a
model in all reports tires names are preceeded by a little square having the
model color. Look in the right panel the Bridgestone T4100 is preceeded by a
little red square)
-
change the type (driving, tractor, trailer)
-
change the initial wear
-
change the minimum allowed wear this is used to calculate the cost by
32th or mm
-
starting at which minimum wear the name of the tire will appear in red in the report and when an alert will be fired for
this tire
You can
also change the remark which contains by default the name of the manufacturer
and then click the “Update” button.
Deleting a dimension
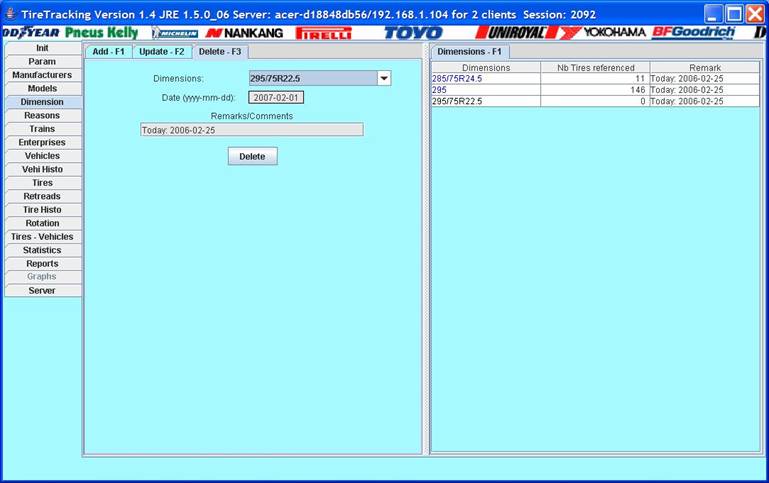
To delete a
dimension you select the dimension in the drop-down list of the left panel or
you click on it on the right panel.
Note that
in the right panel the dimensions used are in blue
the ones that are not referenced in black.
You cannot
delete a dimension that is referenced by a tire. (As you
cannot delete a manufacturer which has models). If you try to do so a
warning message will be displayed. The drop-down list displays only the dimension that are deletable (in our case “295/75R22.5”)
Updating reasons:
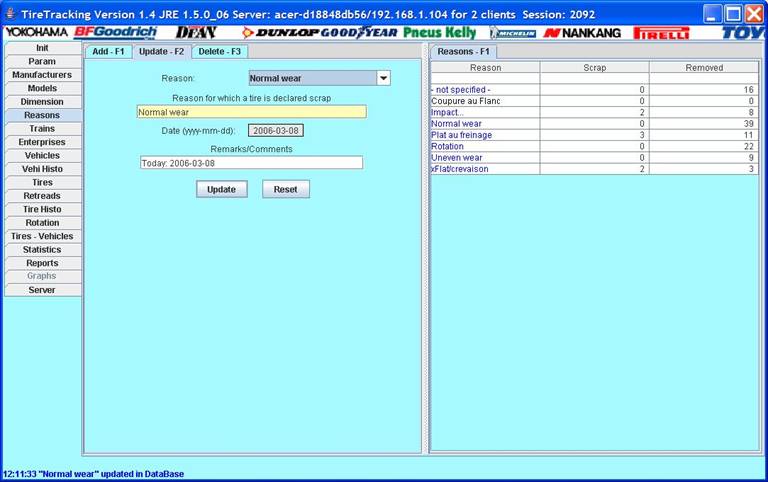
Multiple
reasons for which a tire is removed from a vehicle or for which a tire is
re-tread are offered. You can add your own.
Later on a
report shows statistics about these reasons for every tire model. That lets you
know that a certain model of a certain manufacturer is more encline to flat that
another model.
07) Trains screen
Train is a
very important concept.
A train is
a combination of axles and tires. There are motorized and trailer trains.
A motorized
train can have the following types of axles:
- driving
- tractor
- air
- tag
A trailer
train can have the following types of axles:
- trailer
- air
You can
define as many train as you want. You then associate multiple vehicles to a
train.
There is a
report that presents statictics on how wear appears on different trains. You
can also define “equivalent” trains.
For example
a Canadian company can define a train “Trailer 8 wheels Quebec-Ontario” and a
train “Trailer 8 wheels USA-Mexico” and compare how the wear appears on the
different vehicles of these two trains. If the vocation of a vehicle is changed
it always possible to change its train as long as the new train is “equivalent”
(same axles and same tires defined) to the previous one.
To add a
train you click with the mouse on the tire used and you select the type of the
axle on the drop-down list.
How to define a Prevost bus:
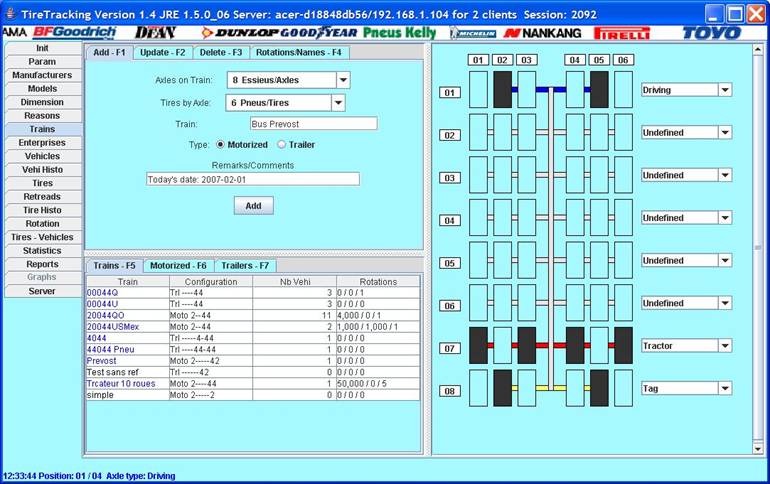
As you can
see we have a driving axle, a tractor axle and a tag axle which were selected
by the drop-down list a the right of the axle.
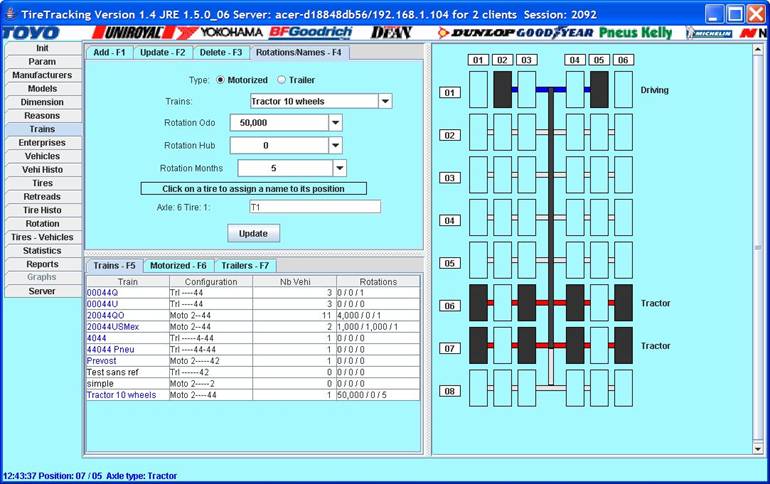
Another
important item to consider is the “Rotation/Names” tab. This tab allows you to
define when rotations are due.
Rotations
can be defined according to the value of the odometre, the hubometre or the
number of month. The values registerered in this rotation tab are used to fire
alerts when rotations are late.
Another
field is the “tire name” field. Il all
reports tires positions are displayed as axle number/tire number like : 07/01 but most trucking companies have their own
naming convention. This field allows you to defined
how the tire position will be displayed in the reports.
Naming axle 6 tire 1: “T1”
08) Enterprises screen
Most
companies will only have to define one company itself. Other providers manage the fleet of more than
one company in this case more than one company must be defined.
Vehicles always
belong to one company. Tires can be reserved for a company or be available to
all. This depends on how the provider
manages its tires.
The
enterprises screen allows you to add, update, delete a company with different
data on this company (contact name, phone number, …)
09) Vehicles screen
To add a
vehicle we have to specify:
- the cie to which it belongs
- its train (a little diagram of the train appears on the
right left corner of the screen).
If the
vehicle s motorized if measurements are taken from:
- the odometre
- the hubometre
- both.
The
measurement units (can be kilometres for the odometre and miles for the
hubometre).
Statistics
are also available in days for both motorized vehicles and trailers.
Adding a vehicle:

When you
update a vehicle you can only change its train for an “equivalent” train.
You cannot
delete a vehicle who has or had tires assigned. We
will first have to delete these tires.
10) VehicleHisto screen
On this
screen you can add, update, delete an history records which
contains the distance appearing for the odometre and the hubometre.
If the
vehicle has one or more air axle a drop-down list allows you to select and air
axle and a slider lets you specify the percentage of utilisation of the air
axle for the period.
You can
select the vehicle from the drop-down list on the left panel or selecting the
company and then by clicking on the vehicle on the right panel tab “company”.
Update vehicle history record:

You can not
have to history records for the same date.
On the
right panel the date of the history records are in blue if a tire was removed
from the vehicle.
You can
change the wear of an history record but not its date
if a tire was removed at that date.
The Vehi
Histo panel has also 2 other tabs. The “Tires History” tab and the “Garage
Report” tab.
The Tires
History tab is used to enter wear for the different tires of a vehicules. These
enties will be dated the date of the history record.
The Tires
History pane

Select the
tire with the drop-down list on the left panel or click on the tire with the
mouse on the diagram of the vehicule on the left.
The history
records of this tire will appear on the bottom of the left panel.
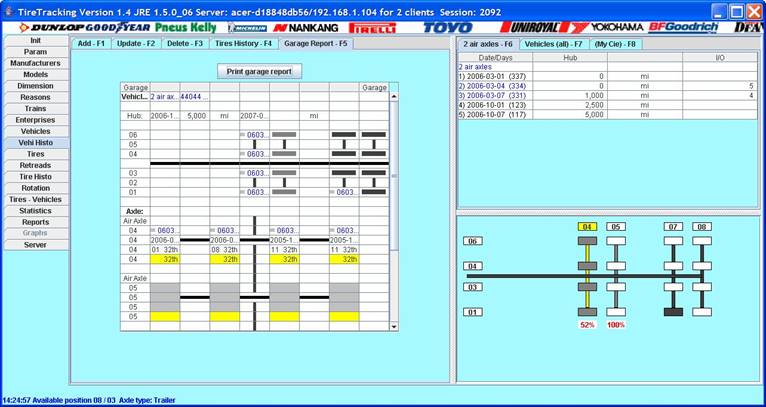
The “garage
report” pane is used to display the vehicle and its tires with their last
measurements.
This report
can be printed so mechanics in the garage can enter the new wear measurements.
Garage report screen:
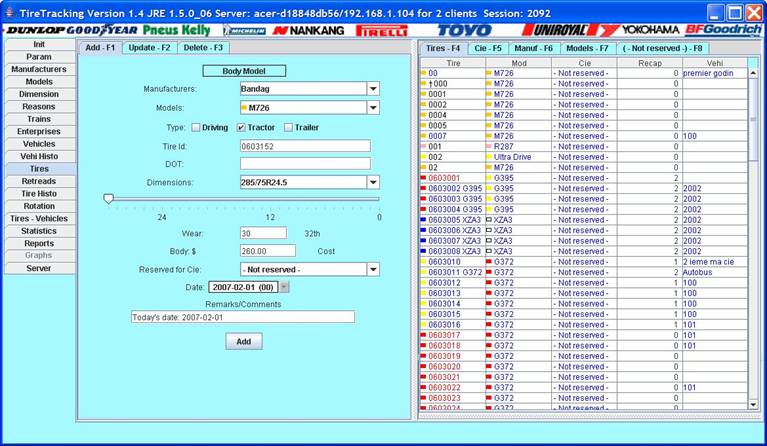
11) The Tires screen
Finally the tires by themselves.
Tires can
be added, updated, deleted.
You cannot delete
a tire that is installed on a vehicle.
You have to
enter the name of the tire, its cost, the company it belongs to or “not
reserved”, its model and the initial wear if the model’s initial wear is not
used (will be the case for a used tire).
Add tire screen:
If you want
to change the cost of a tire cost use the Retreads screen.
You should
use the Update tab to declare a tire scrap and optionnally select a reason.
12) Retreads screen
This screen
is used to add a tread to a tire. You can update the thread cost (including the
body cost).
You canot
delete a tread that has been used on a vehicle. Deleting a tread is only
permitted to remove a tread that has been added by mistake.
Adding a tread:

You cannot
add a tread to a driving tire.
A “†” precedes
the name of the tires that have been declared scrap.
By default
the initial wear is the one of the model but a slider let you change this
value.
13) Tire Histo screen
This screen
is used to add, update, delete an history record for a
tire.
You can
also perform the add operation from the “Tires History” tab of the Vehicle
Histo screen.
Select the
tire from the drop-down list on the left panel or by clicking on the tire on
the right panel.
Add tire histo:

The right
panel shows all the already wear records for this tire.
14) Rotation screen
Use this
screen to rotate tires.
Fisrt you
select the vehicle and then click with the mouse on the tires you want to
rotate.
The
selected tires colors change to yellow.

The history
records of the selected tire appear on the left bottom of the screen.
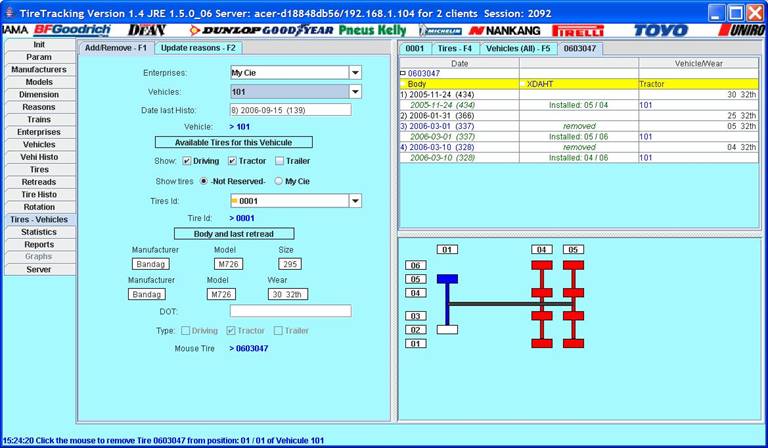
15) Tires-Vehicles
This screen
is used to add or remove tires from/to vehicle.
Select
first the vehicle and available tires will appears on
the drop-down list.
Tires are always
added or removed at the date of the last history record of the vehicle.
Pass with
the mouse over the tire of a vehicle, the history record of this tire will
appear.
Click on a
tire on the vehicle diagram, a pop up menu will ask you to confirm that you
want to remove the tire for the reason specified.
Click on an
empty tire on the vehicle diagram, a pop up menu will ask you to corfirm that
you want to install the selected tire.
Add/Remove tires from a vehicle
16) Statistics screen
This screen
has 3 panes.
The first
one shows counters on how many tires, vehicles, re-tread, trains,
manufacturers, models,… are registered in the
database.
The second
one shows what should be the wear on all tires according to the vehicles
history records and the tire history records.
The third one show which rotations are late according to which criteria.
Wear statistics
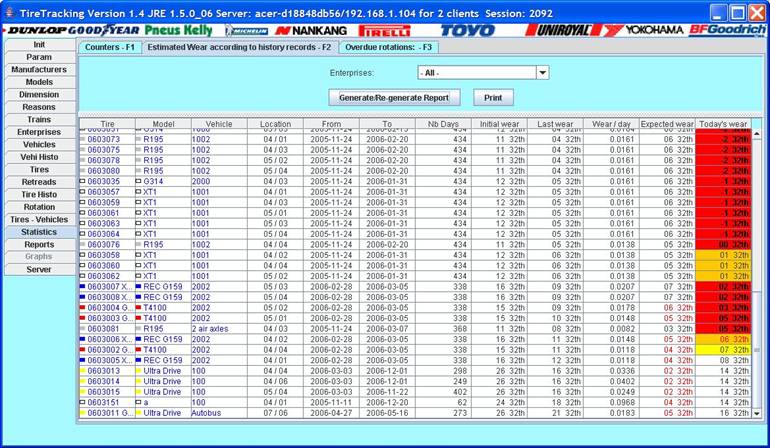
For every
tire we have:
-
its model
-
the vehicle where it is installed
-
the position on the vehicle
-
the dates of the first and last wear history records from which
calculations were done
-
the initial and last wear
-
the average wear by day
-
the expected wear for the days from the last history record to today
-
and so what the wear should be
Note the wear
with foreground in red are wears under the minimum specified for the model
Rotations
overdue
This panel
shows the rotations overdue and based on which criteria. It can be odometre, hubometre or days.
Different
shades colors from yellow to red show the relative importance of the criteria
used to determine overdue.

On the left
side appear in yellow which criterias are used to decide that an overdue was
detected.
17) Reports
Five
reports are presently available:
1. detailed by tire
2. by model
3. the reasons
4. by train
5. by vehicle
The tire
report displays statistics about a particular tire cost by mile/kilometre for
the odometre, the hubometre and always by day.
Cost for
each unit of wear…
Tire Report

This tire has
a body and 1 tread. The train and the position on the train are showed.
The % util
is for the air axle. In this case this
is a driving tire for a tractor so its %util is always 100%.
A list of
the history records is provided.
The reports
can be sent to Excel but this requires a paid license.
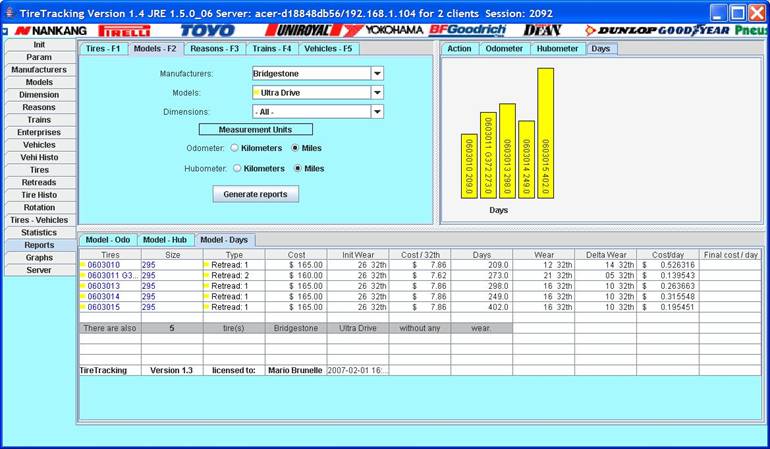
The model
report offers less details statistics but the values are grouped for a certain
model.
Model report:
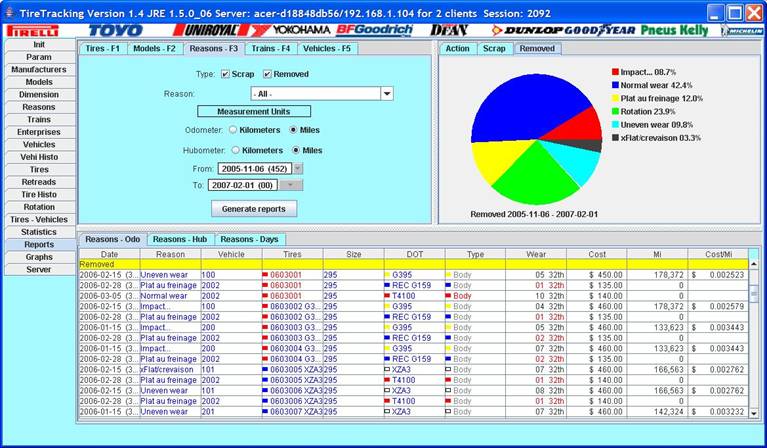
The reason
report display the reason why tires where declared scrap or removed from a
vehicle.
Reason report
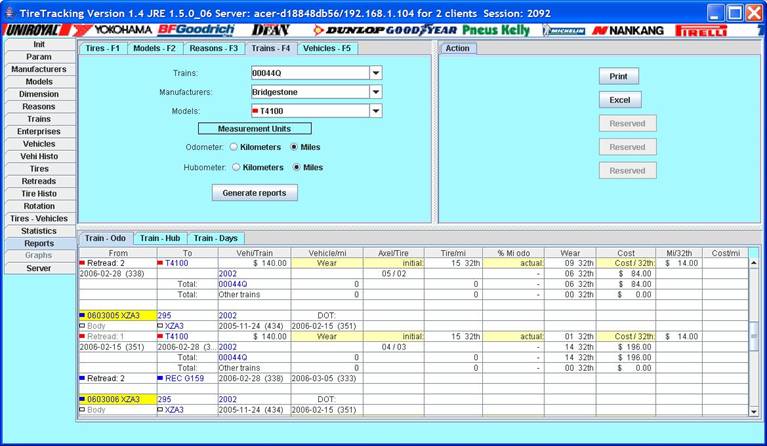
The train report compare the behavior of a certain model of tire on a
particular train.
Train report.
Finally the
vehicle report is used for companies who need to know on a daily basis how much
available wear they have on the road and how much wear was used from date to
date.
Vehicle report:
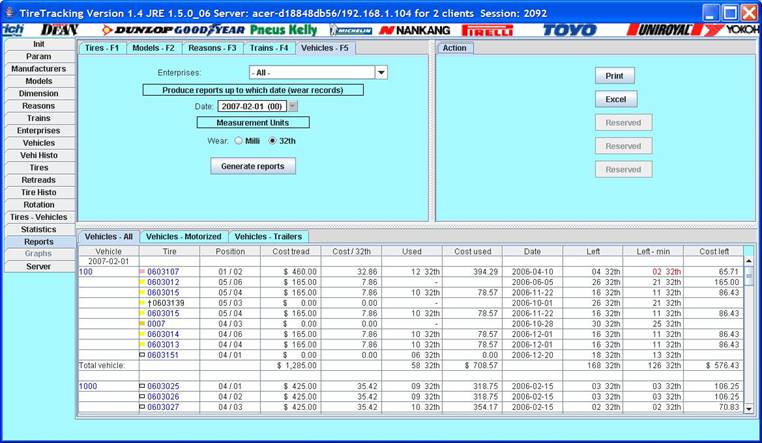
Note the
wear in red which denotes that according to company policy this tire has
excessive wear.
18) Graphics screen.
The graphics
screen displays in full screen the small graphics displayed in upper right
corner of the report screen.
19) Server screen.
This screen
displays clients informations for customers buying a
client/server license.
